My Cart


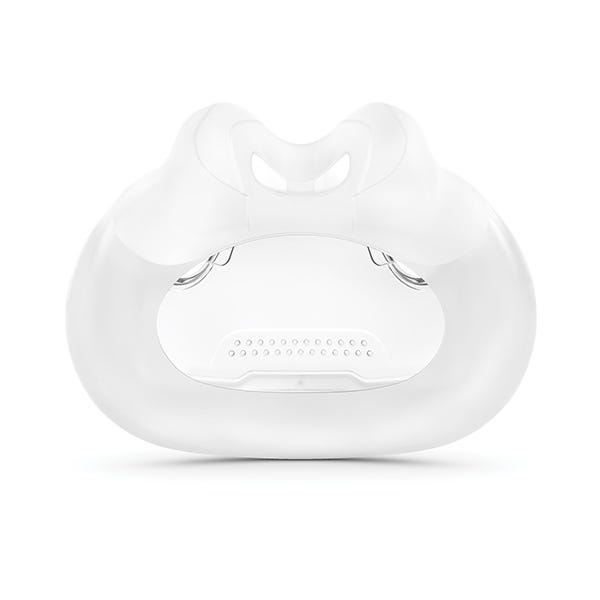
ResMed Mirage Quattro™ Full Face CPAP Mask


$151.00
The ResMed Mirage Quattro™ full face mask, frame, clips, and headgear system provides superior comfort through advanced SpringAir™ technology. Get the restful night of sleep you deserve with the Mirage Quattro™.
ResMed Mirage Quattro™ Full Face CPAP Mask Overview
The Mirage Quattro™ is ResMed's fourth generation full face mask that fits over 95% of users. The Quattro™ features an intuitive MicroFit dial, which provides personalized fit and enhances seal without over tightening the headgear. Headgear is available as an option but not included automatically. It is also not required. However, if you'd like your order to include headgear, please select your preferred option above. ResMed's patented Mirage dual wall cushion provides a stable, secure seal, while the cushions spring air technology accommodates movement during sleep and allows the mask to sit comfortably on the face. The moving membrane adapts to different facial structures and combines with the cushion for a built in solution to jaw drop. In addition the masks streamlined design feels light on the face and features built in vents to reduce noise.
Please note: headgear is available as an option but not included automatically. It is also not required. However, if you'd like your order to include headgear, please select your preferred option above.
- Mirage™ dual-wall cushion with Spring Air™ technology accommodates for movement while sleeping
- MicroFit™ dial lets you easily adjust the forehead support, allowing you to find the best fit for your unique and personalized needs
- Set it and forget it headgear clips and slots allow you to remove your headgear while saving your fit settings.
-
1 - Mirage Quattro™ Mask Frame and Cushion (of selected size option)
-
1 - Elbow
-
1 - Swivel
-
1 - Forehead Support & Pad
Please note: headgear does not automatically come with the order. If you'd like your purchase to include headgear, please select your headgear option above. If you select a headgear option, the following will be included:
-
1 - Mirage Quattro™ Headgear
-
2 - Headgear Clips
Breathing Style:
-
Mouth Breathers
Sleeping Style:
-
Back Sleepers
-
Side Sleepers
Additional Considerations:
-
High Pressure Settings
-
Chronic Allergies or Nasal Congestion
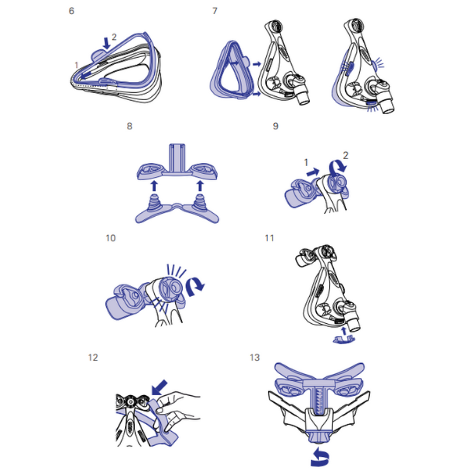
Assembling Your Mask:
Refer to the assembly diagrams in these instructions.
Before reassembling the mask, check that all components are clean and dry.
Check that the valve is not damaged, distorted or torn, and that none of the
other components are broken or cracked. Replace any parts that are damaged.
- Fit the cushion clip into the grooved edge of the mask cushion. Fit the top
section first, then work your way around, pushing the clip into the cushion
(Fig. D-6). Ensure that the cushion is not twisted or distorted around the
clip. - Align the cushion clip with the mask frame. Push the cushion clip into the
mask frame, ensuring that all three clips click into place (Fig. D-7). - Push the forehead pads firmly into the forehead support (Fig. D-8).
- Insert the forehead support into the mask frame and screw the dial
clockwise onto the pole (Fig. D-9). Turn the dial until it clicks (Fig. D-10).
Ensure the dial sits flush against the frame. - Insert the ports cap (Fig. D-11).
- Reattach the top headgear by threading it through the loop (Fig. D-12).
- Turn the dial until you reach the setting that gives you good comfort and seal
(Fig. D-13).
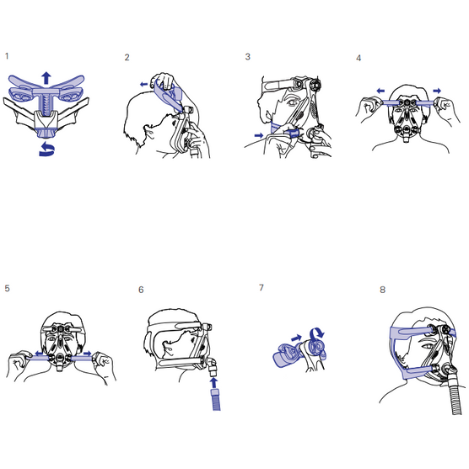
Fitting Your Mask:
Remove all packaging before using the mask.
Refer to the fitting images inside the front cover of these instructions.
- Twist the forehead support dial to Position 24, where the forehead support
is fully extended (Fig. B-1). - Hold the mask steadily on your face (Fig. B-2) and pull the headgear over
your head. - Bringing the lower straps below your ears, clip the headgear to the lower
part of the mask frame (Fig. B-3). - Unfasten the Velcro®, pull the upper headgear straps evenly until they are
comfortable and firm, and reattach the Velcro (Fig. B-4). - Repeat step 4 with the lower headgear straps (Fig. B-5).
- Test the functioning of the valve by sealing the swivel with your hand and
ensuring that you can still breathe freely. - Connect the main air tubing to the swivel (Fig. B-6). Then connect the free
end of the air tubing to your flow generator and turn the flow generator on. - Lie down in your sleeping position. Twist the forehead support dial
(Fig. B-7) until you feel that the mask is evenly positioned on your face. It
should be comfortable, with a satisfactory seal. Gently tighten the lower
headgear straps if necessary
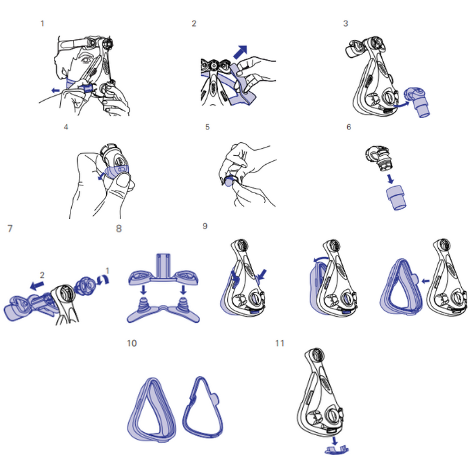
Disassembling Your Mask:
Refer to the disassembly diagrams in these instructions.
- Detach the air tubing.
- Unclip the lower headgear clips (Fig. C-1) and unhook the upper headgear
straps (Fig. C-2). It is not necessary to remove the headgear clips from the
headgear. - Remove the elbow assembly from the mask frame (Fig. C-3). It’s easier to
pivot the bottom of the elbow away from the mask frame than to pull the
elbow straight off. - Remove the valve clip from the elbow (Fig. C-4).
- Peel the valve away from the valve clip (Fig. C-5). Do not pull on the
membrane to remove the valve. - Detach the swivel from the elbow (Fig. C-6).
- Note the position on the dial for the next time you use the mask.
- Fully unscrew and remove the dial then pull the forehead support out of the
mask frame (Fig. C-7). - Remove the forehead support pads from the forehead support (Fig. C-8).
- Squeeze and push the upper side tabs on the cushion clip out of the mask
frame. Pivot away from the mask, and gently pull out (Fig. C-9). - Separate the cushion from the cushion clip (Fig. C-10).
- Remove the ports cap from the mask frame (Fig. C-11).
| Operating Therapy Pressure Range |
| 4 to 40 cm H²O |
CPAPsupplies.com: CPAP Supplies Replacement Schedule
Mirage Quattro™: Overview and Fitting Guide

- CPAP Mask Frame Replacement Frequency: Resupply Every 3 Months
- CPAP Mask Cushions/Pillows Replacement Frequency: Resupply Every 2 Weeks
- CPAP Mask Headgear Replacement Frequency: Resupply Every 6 Months
CPAPsupplies.com: CPAP Supplies Replacement Schedule


| Brand | ResMed |
|---|---|
| SKU | pb_quattro_ffmask |
| Model | pb_quattro_ffmask |
| UPC | 619498612000 |
| Prescription Required | No |
| Manufacturer's Warranty | 90-day limited manufacturer's warranty |
| FSA/HSA Eligible | Yes |
| Dimensions | 3 3/8" (W) x 5 1/8" (H) |
| Included | 61260, 61261, 61262, 61263, 16118, 16117, 16119 |
Compatible Products
Check items to add to the cart or


1 Item Added to Cart


